Principle 2:
Composting
Goal: Maximize compost quality and quantity
AND
maximize microbial diversity
Composting is the second leg of the three-legged stool. GB composting strives to produce the maximum amount of compost from the materials used. It also maximizes microbial biodiversity through a correctly built and “cured” compost pile using plant material from your farm, food scraps from your kitchen, and soil from the beds.
Healthy compost is broken down plant material that returns nutrients and carbon to the soil, so the soil regains fertility and waste is minimized. Quality compost in the soil provides sustained release of nutrients for plant roots and microorganisms. It provides more aeration for roots and microbes. Compost helps buffer challenging soil conditions, like high or low pH, or too much clay or sand. The organic matter in compost also helps increase water retention, so you need to water less. By using compost to support soil fertility you can be more self-sufficient and rely less on purchased organic fertilizer.
To make GB compost, start by picking any space available to put your compost pile, maybe even on a growing bed. Next, gather your materials, collect them over time and/or use what you have on hand:
Move your mouse over a link below to see the materials
1. Mature Material — Did this plant grow to its old age and produce seed? If so, the plant is mature and made up of material that is complex and tougher to breakdown. Think of a corn stalk after it has borne fruit. It is structurally strong.
2. Immature Material — Did this plant grow to its old age and produce seed? If not, the plant is immature and made of material that is less complex and easier to break down. Think of alfalfa plants or lettuce leaves that are very flexible. It can sometimes be hard to differentiate between mature and immature materials, so just do your best.
3. Soil — this comes from the first trench of soil you removed during the double dig. Keep a little around after double-digging for compost building.
4. Roughage — This is plant material that is thick and tough and will take many compost piles before it decomposes. Think of branches from trees or stalks of cassava. Roughage is used once in each pile, so only a small amount is necessary.
Hint:
Make the base of the pile at least 3 ft x 3 ft (1 m x 1 m) so the pile is big enough to retain moisture and heat for healthy decomposition.
Now you are ready to build:
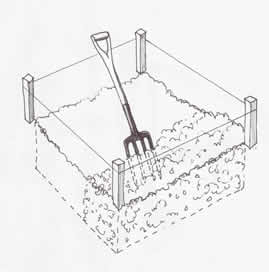
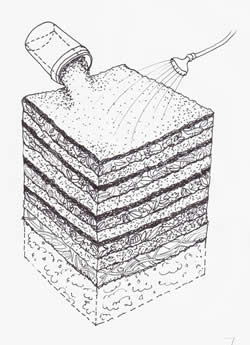
Step 1 Gently loosen the soil where you will build down to 12 in (30cm), so the pile can drain.
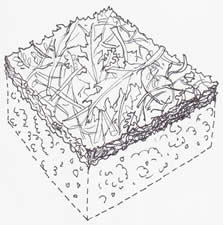
Step 2 Apply roughage about 4 in (10 cm) thick so the pile can drain and breathe.
Step 3 Apply a layer of mature material, about 2 in (5 cm) thick and water until evenly moist.
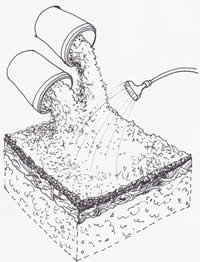
Step 4 Apply a layer of immature material, about 2 in (5 cm) thick and water until evenly moist.
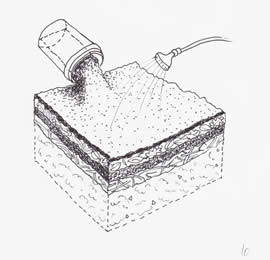
Step 5 pply a layer of soil about ¼ in (½-1 cm) thick and water. The soil plays an important role, helping to stabilize the moisture and temperature levels of the pile and inoculating it with microorganisms.
Step 6 Repeat steps 3 through 5 until you have used up your materials or the pile is tall enough for you to stop working on it, whichever comes first.
Notice that you are using equal volumes of mature and immature materials. This is an important component in producing healthy compost, as both the structural integrity of the mature material and the less-structural immature material contribute to the process of decomposition and the humus-formation that make compost so valuable.
GB Farmer’s Challenge:
Get to know your compost pile. Watch it, smell it, and feel it as it changes. Even on the inside! Learn to know when it is healthy.
Let it teach you how to make even better compost.
If your pile was short when materials ran out or it shrinks a lot, you may want to keep adding to the pile when you have more material, until you decide to call your compost pile finished. Finishing a pile within one month is a good guideline. When you are done building, an additional layer of soil on the top will help the pile to hold moisture. Your compost pile will begin to shrink after you build it.
Because compost is the result of decomposition, maintaining a compost pile is about creating the ideal conditions for this process. Decomposition is carried out by microorganisms in the presence of moisture and air; therefore, the pile must have enough moisture (like a wrung-out cloth) and enough air (too much moisture limits air). You have four strategies to create the moisture balance you want: a) You can loosen your pile, b) water your pile, c)cover your pile or d) do nothing. In some climates, it may be necessary to water the entire pile, or at least the edges daily, to retain moisture. Pile location can help with this too, as shaded piles will retain moisture better. If you notice a sour smell or white color, your compost pile may be anaerobic (not enough air, too much water); loosen it to add air. If the materials are not breaking down, your pile may be too dry; water it and/or cover it to hold the moisture. If all is going well, enjoy observing this miraculous process!
Hint:
Use many different kinds of plant material to support a variety of microorganisms. This maximizes microbial diversity, creating more vibrant, healthier decomposition and compost—plus natural antibiotics in the soil to encourage the maintenace of plant health.
One to two weeks after finishing your pile (adding material for the last time), you may choose to turn the pile. The best time to do this is after the temperature of the pile has peaked and dropped 20° F (11° C) (you can monitor the temperature of the pile using a thermometer). Turning will result in more uniform decomposition, but is not absolutely necessary. To turn a pile, choose a site close-by and complete steps 1 and 2 as outlined on the previous page. Move your pile with a pitchfork or locally available tool, by taking forkfuls off the top of the pile and putting them on top of the new roughage. Form the new pile by placing the less decomposed material towards the center of the new pile and the more decomposed material to the outer edges. Water after every layer you make, if needed, to establish good moisture (like a wrung out cloth). Turning will add air, restarting the decomposition process. Now maintain a healthy moisture level and let your pile cure.
Roll over the picture with your mouse to view second image
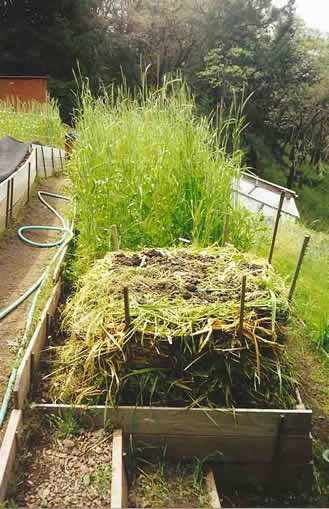
Images 1: A nicely built compost pile; 2: Compost that has been turned.The pile should smell musty, then earthy. The materials should become harder to recognize, ending up as a crumbly, brown-black, woodsy-smelling fertile material that feels rich to the touch. Your pile should take about 3-6 months to cure, depending on the climate. When you decide it is ready, put it onto already prepared beds, working it gently into the top 2-4 in (5-10 cm) of soil. The beds are now ready to plant. If you are not ready to use the compost, disassemble and dry the pile in a dry, airy and warm location, so it doesn’t continue decomposing (over-decomposition reduces the nutrient value of the compost). Store compost dry; it will rehydrate when you use it.
Roll over the picture with your mouse to view second image
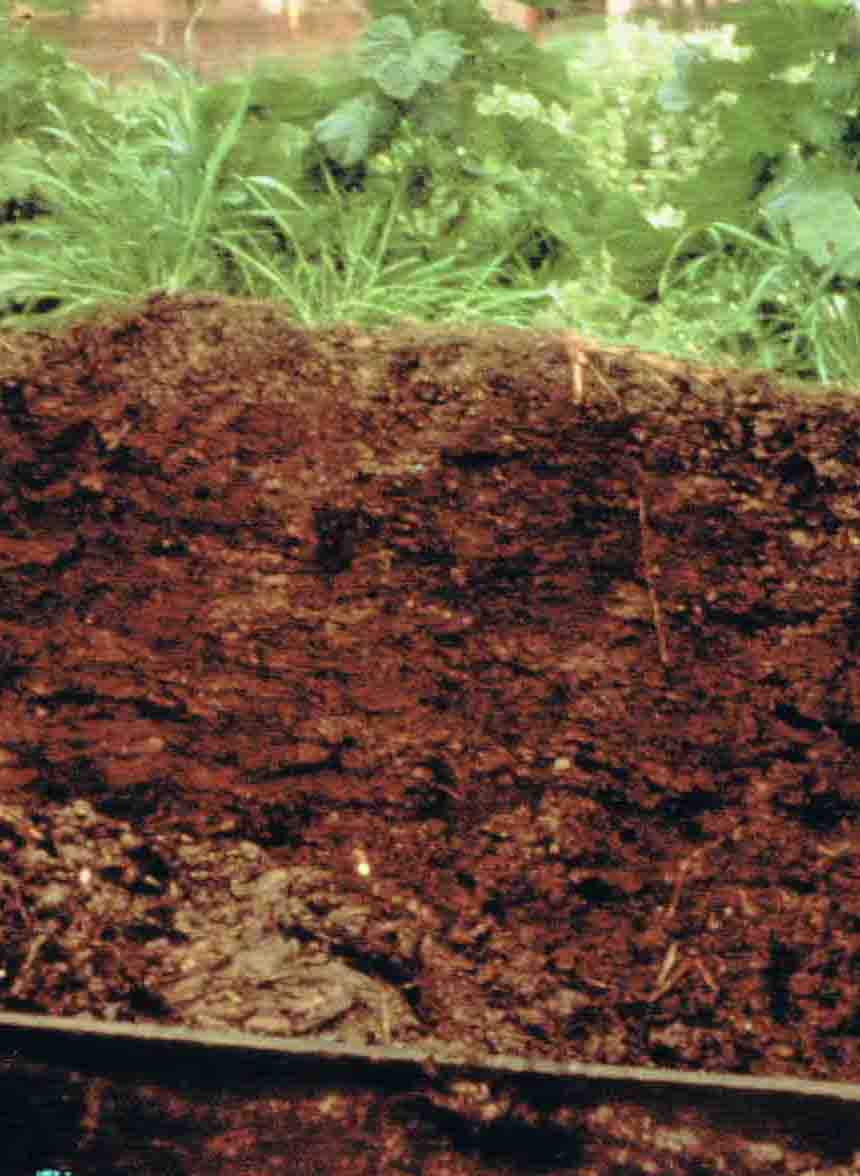
Images 1: A cross section of a compost pile showing rich compost ready to harvest;
2: A compost sifter can help remove large, undecomposed particle from your compost.Notes to Refine Composting:
- If the material available has a lot of oils or readily available nutrients like coffee grounds, citrus peels, or manure, limit it to no more than 1/6th the volume of the completed pile.
- There are some things that are better to avoid putting into compost piles because they don’t decompose well. They have strong components that inhibit the decomposition process, or they contain undesirable eggs or seeds that can survive the curing process. Examples include: magnolia and eucalyptus leaves, poisonous plants, ivy, insect or disease infested plants, etc.
- The more mature material in a compost pile, the cooler and slower the decomposition. The resulting compost has higher amounts of stable organic matter that will have positive long-term affects in the soil. “Cool” composting is also better at maximizing the quantity of cured compost created per unit of built compost, which is part of the composting goal.
- A yearly compost application for each growing bed is a general guideline.
- When applying compost, more is not always better. Remember to apply a quantity that can be sustainably produced by your farm.
- Because compost is a stable form of organic matter with long-term benefits for soil fertility and structure, it is preferable to put all crop material into a compost pile rather than turning crop matter directly into the soil.
- Compost supports soil fertility, but it may not contribute specific nutrients that a soil is lacking. For this reason, it is recommended to test your soil annually for basic and trace nutrients. If the soil is deficient, an annual addition of organic amendments as recommended by the soil test can help stabilize the soil nutrients.
- Caring for soil through composting and careful preparation will help hold onto these nutrients and over time you will find yourself needing to add fewer and fewer amendments.
- http://www.timberleafsoiltesting.com/ is a trusted resource.
By composting your own materials, you are actively taking care of your land by returning fertility to the soil. You are building soil and contributing to the long-term health of your farm! Your three-legged stool has two strong legs.

