Soil Science Spotlight: One of the primary functions of the GROW BIOINTENSIVE method is to allow small-scale farmers everywhere to build and maintain soil fertility levels that will allow the farmers to grow a large amount of food and compost materials in a very small area, with greatly reduced resource use, for an indefinite period of time, sustainably. Soil testing and the application of the correct type and quantity of organic soil amendments at the correct time is a fundamental part of building and maintaining sustainable soil fertility levels. To introduce the topic of soil testing and the reasoning and methodology involved in soil test analysis and making soil amendment recommendations to a wider audience, John Beeby and Ecology Action are creating a series of topics on the subject called “Soil Science Spotlight”, which is posted to growbiointensive.org in the “Protocol” section with new posts added often.
In parts 1-5 of this series, I introduced Dr. John Doran's USDA Soil Quality Test Kit Guide USDA Soil Quality Test Kit Guide, developed by Dr. John Doran, and discussed the Guide's tests for infiltration, physical observations, aggregate stability, earthworms, soil respiration and pH, and electrical conductivity (growbiointensive.org/ SoilScienceSpotlight). In this issue, I want to talk more about one of the Guide's tests: bulk density, specifically, how to know when adding air to soil (tilling) may be helpful, based on bulk density. *** To till or not to till: Adding air to soil based on bulk density: To dig or not to dig, that is the question…at least once a year for farmers and gardeners around the world. Even the no-till ones wonder about this sometimes, and rightly so. For a soil to be healthy, it must have sufficient air in it, because the soil breathes. It breathes in air from the atmosphere, through the physical forces of mass flow and diffusion. Mass flow drives the transfer and exchange of atmospheric air and soil air due to differences in air pressure. Diffusion is the process that occurs when gases in higher concentration want to move to areas where they are lower in concentration: oxygen in atmospheric air diffuses into soils because there is typically a higher concentration of oxygen in atmospheric air compared to soil air. Similarly, carbon dioxide moves from the soil air to atmospheric air because there is typically a higher concentration of carbon dioxide in the soil than there is in atmospheric air. So, with this air movement, it can be thought that the soil is breathing. In fact, the life in the soil is respiring, taking in oxygen and converting energy-containing carbon molecules (soil organic matter) to carbon dioxide (and other substances), which is the source of the lower concentration of oxygen and greater concentration of carbon dioxide in the soil air compared to atmospheric air. All this air movement, breathing and respiring, does not occur if the soil is so compacted that little air can enter or exit it. And a soil that is not breathing is a soil that is dead, infertile, and prone to rapid degradation. So how much air does a soil need and how do we know if it has enough or if adding air to the soil would be helpful? One way to answer this question is to measure the soil’s bulk density. In general, if a soil’s bulk density is greater than 1.6 g/cm3, there is not enough air in the soil and roots will not be able to grow uninterruptedly into the soil. Measuring a soil’s bulk density
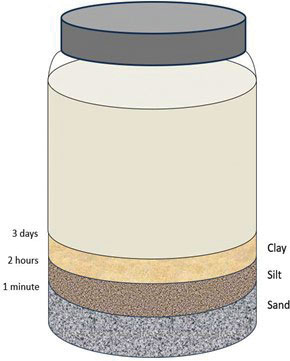
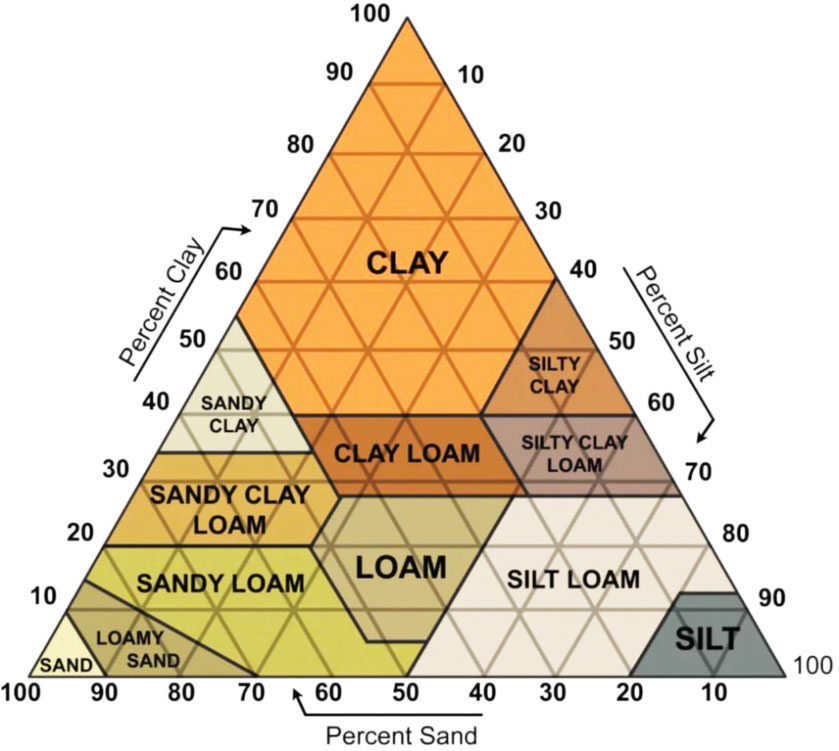
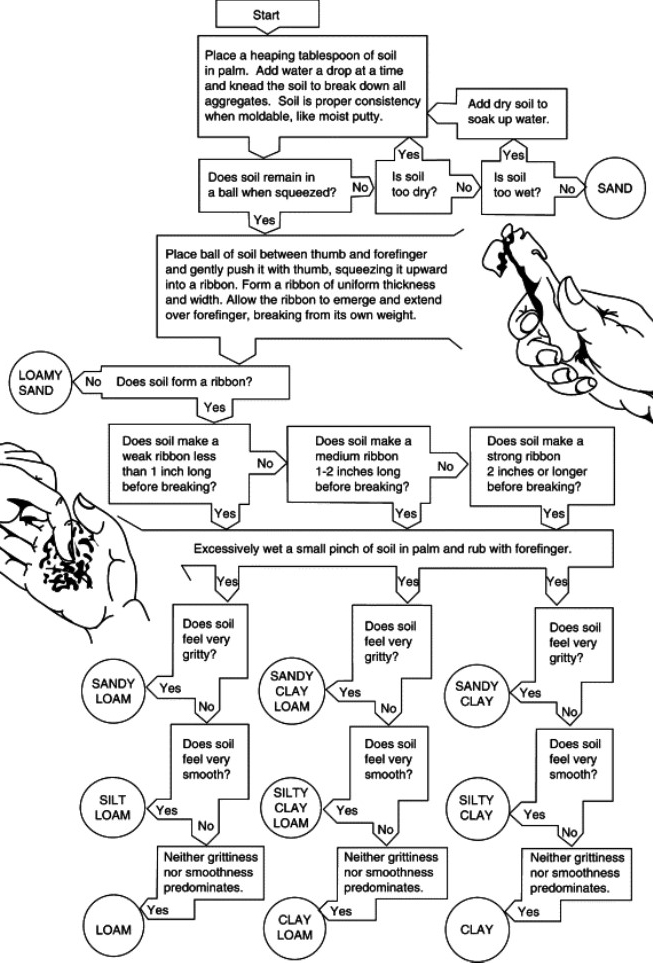
Soil texture is based on the amount of sand, silt and clay there is in the soil. Sand particles are quite large and visible to the eye. Silt particles are much smaller and are not visible to the naked air. And clay particles are much, much smaller than silt particles! While all of these particles can exist in a compacted state, when sand is compacted, there is still quite a lot of space between the compacted sand particles through which air and water can travel. When silt particles are compacted, and especially when clay particles are compacted, there can be very little space between the particles, making passage of air and water very slow and difficult. Soil texture is classified by the percentage (by weight) of sand, silt and clay particles in the soil. There are 12 different texture types (sandy, sandy loam, silty clay loam, clay, etc.). Determining a soil’s texture can be done in one of two ways. The first method is known as the jar method and while there are different procedures published to perform the jar method, I’ve found that this one works well. Measuring a soil’s bulk density
How to determine soil texture with the Ribbon Method
Discussion Understanding your soil’s unique characteristics is fundamental to knowing how to improve it. However, there are faster methods to determine if your soil needs more air. Rather than measuring bulk density, a penetrometer can be used to determine if your soil is compacted and in need of air. A penetrometer is easy and fast to use, but is more costly (US$200-300) compared to relatively simply bulk density equipment. A penetrometer measures pressure in PSI (pounds per square inch) or kPA (kilopascals) rather than density in g/cm3. The guidance with penetrometer measurements is that a soil needs more air if it requires greater than 150 PSI to penetrate. Penetrability is highly dependent on soil moisture content and PSI readings can vary 5-10x between a soil being dry and the same soil after irrigation. This variability can make a soil’s compaction level difficult to interpret especially in the upper 15-30 cm (6-12 inches) of soil due to moisture variability. With experience, you can also use a metal rod to determine if a soil is compacted at a level that could impede roots. Use the metal rod (18 inches long, 1/8 inch diameter, or 40-50 cm and 2-3 mm in diameter) to probe the soil and note changes in resistance that would indicate compactness and restrictions in water movement and root penetration. It is best to do this when the soil is near field capacity since, like the penetrometer, resistance depends strongly on the soil water content: the dryer the soil, the greater the resistance. Since this method is entirely subjective and does not provide any quantitative data, you would need to use this method in conjunction with the bulk density and/or penetrometer method until you gain sufficient experience to rely on it by itself. When your soil is compacted, the immediate solution is to till the soil to add air. However, tillage encourages the loss of soil organic matter, since till adds air and exposed previously hidden organic matter to soil microbial decomposition. A better solution is to till if more air is needed in the soil and to also add compost to replenish soil organic matter that will be lost as a result of tilling. An even better solution is to also grow compost crops to produce your one compost that will be used to maintain and improve your soil’s organic matter in the future. Adding cured compost to the soil feeds the soil microbes which create macro- and microaggregates in your soil. Microbial exudates, fungal hyphae and root hairs all collaborate to bunch soil particles together into aggregates or “peds”, which are the very small balls of soil that you can see with your naked eye when you pick up a healthy soil, like crumbs from a chocolate cake. Those aggregates create space between them through which air and water can flow freely into the soil, and having good aggregation, good soil structure, is an important goal for a sustainable farmer wanting to minimize tillage, retain soil organic matter, encourage carbon sequestration, allow roots to grow uninterruptedly, improve water infiltration and storage, and provide a good environment to support a wide range of soil biology.
♥
top | Newsletter Home |Table of Contents| Archive
|
||||||||||||||||||||||||||||||||


